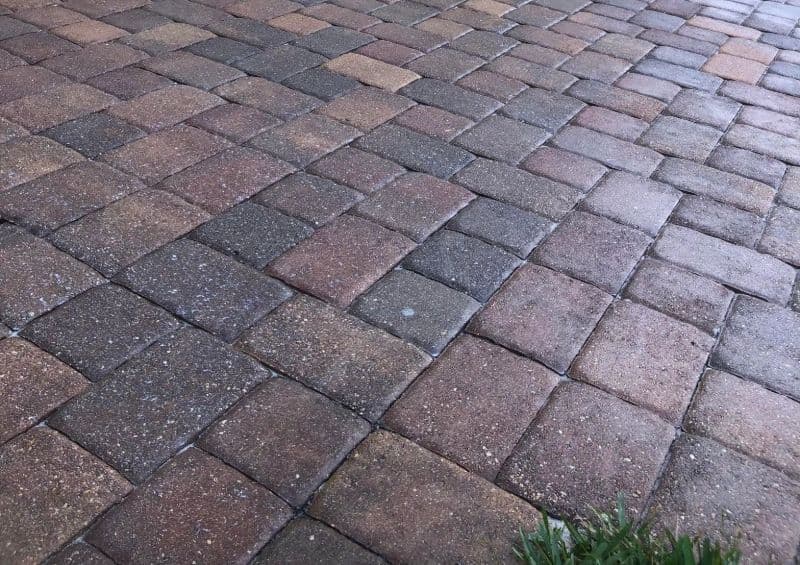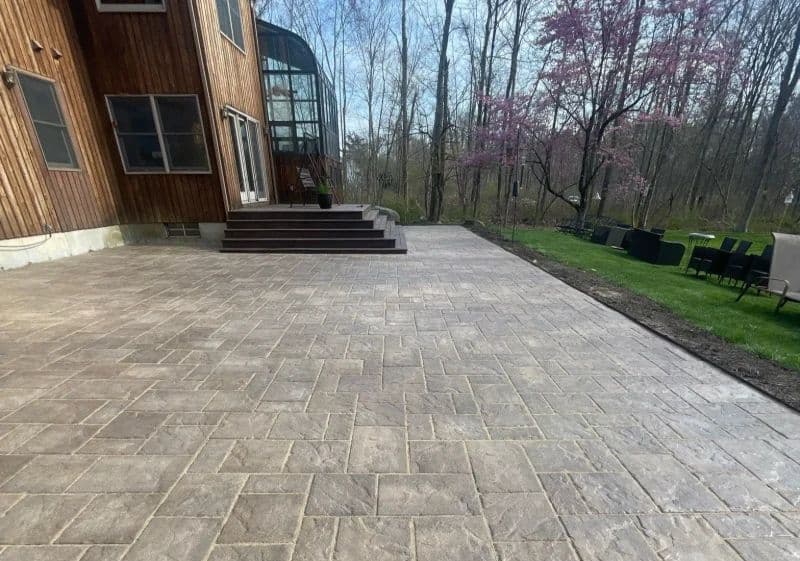
Professional paver sealing transforms faded, worn pavers into vibrant, protected surfaces in just 1–2 days. Here's how it works:
- Inspection: Experts assess paver conditions, checking for structural issues, stains, and moisture levels.
- Preparation: The area is cleared of furniture and debris. Nearby surfaces are protected, and plants are rinsed to prevent chemical damage.
- Cleaning: Stains are treated with specific solutions, followed by controlled pressure washing. Efflorescence and mold are carefully addressed.
- Joint Sanding: Polymeric sand is swept into gaps, locking pavers in place and preventing weeds.
- Sealing: A sealer is applied using sprayers and rollers, ensuring even coverage and long-lasting protection.
- Final Inspection: The surface is checked for uniformity, and drying times are outlined - foot traffic in 2–4 hours, vehicles in 48–72 hours.
Hiring professionals ensures durable results that last 3–4 years, unlike DIY efforts that often fall short. Companies like ViewCrew Services offer expertise, high-quality materials, and a satisfaction guarantee, making it a cost-effective alternative to full paver replacement.
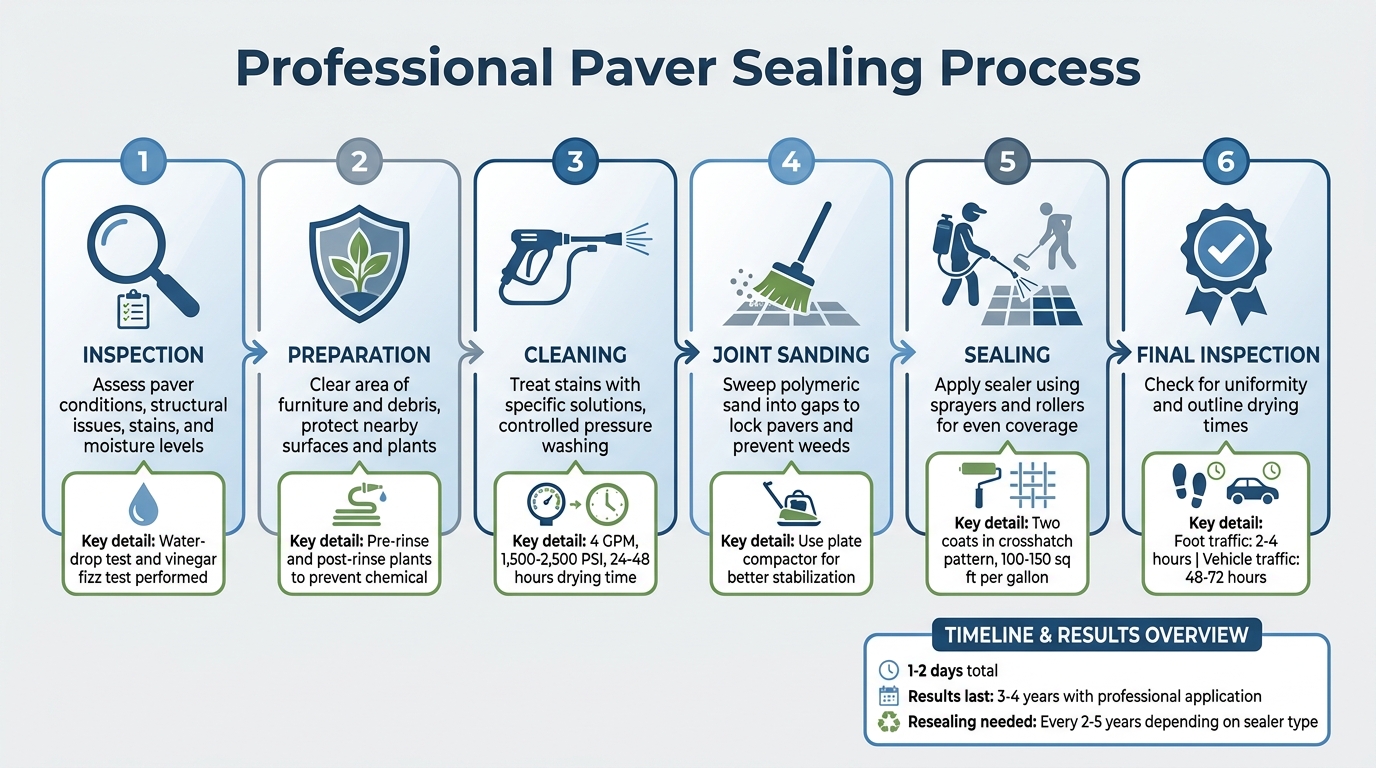
6-Step Professional Paver Sealing Process Timeline
Inspection and Preparation
Checking the Surface Condition
Before starting any cleaning or sealing, professionals carefully inspect the pavers to identify any issues that might affect the final outcome. They look for structural problems like sunken areas, loose joints, or pavers that shift underfoot, often referred to as "pumping." These issues need to be fixed before sealing can begin. As Jesse Johnson from Bulletproof Pavers points out:
If the base is failing and pavers are pumping under footfall, a sealer will not stabilize the system.
Professionals use diagnostic tests to evaluate the surface. For example, a "water-drop test" helps detect coatings or residues - if water beads on the surface, a chemical stripping process is necessary. For concrete pavers, a "vinegar fizz test" is used to check for efflorescence (salt deposits). Efflorescence must be treated because:
sealant bonds to pavers, not to chalky efflorescence, mildew, or leftover polymeric dust.
Moisture content is another key factor. Even if a surface looks dry, it might still hold up to 12% moisture internally, which can cause the sealer to turn milky or peel away.
The inspection also involves identifying specific stains - such as rust, grease, tire marks, algae, and mildew - since each requires a different cleaning solution. Additionally, the type of paver material matters. Whether it’s clay brick, concrete, or natural stone like travertine, the material determines the cleaning method and sealer choice. Joint conditions are also reviewed, noting the presence of weeds, moss, or low sand levels, which might require re-sanding.
Once structural concerns are addressed, the focus shifts to preparing the site for work.
Preparing the Work Area
After the inspection, professionals clear and secure the area to ensure a smooth process. Items like furniture, grills, planters, and debris are removed to create an open workspace. Dust and pollen, which can interfere with the finish, are cleared away with sweeping or blowing.
Protecting nearby surfaces is a critical step to avoid unintended damage. Plants and landscaping are pre-rinsed with fresh water before applying cleaning agents like sodium hypochlorite, and they are rinsed again afterward to neutralize the pH and prevent chemical burns. Expansion joints made of silicone or urethane are taped off because acrylic sealers can crack if applied to these flexible materials. Glass, vehicles, and other surfaces are shielded from overspray, while pool coping and waterline tiles are thoroughly rinsed to prevent chemical reactions. This careful preparation ensures the sealing process is efficient and produces high-quality results.
sbb-itb-238bf3c
Cleaning and Joint Preparation
Pressure Washing and Removing Stains
Once the work area is clear and secure, the next step is deep cleaning the pavers. Professionals rely on a combination of targeted chemical treatments and controlled pressure washing to tackle this phase effectively. The key is matching the cleaning solution to the specific type of stain - sodium hypochlorite for algae, alkaline degreasers for tire marks, and oxalic acid for rust. These specialized cleaners are designed to avoid harsh acids, solvents, or caustic materials, ensuring the pavers and surrounding plants remain unharmed.
To apply these solutions, professionals use low-pressure sprayers, ensuring even distribution across the surface. The detergents are applied to a pre-wetted surface and left to sit, allowing them to break down contaminants more effectively than pressure washing alone. Jesse Johnson from Bulletproof Pavers highlights this approach:
Match the cleaner to the stain and keep the pressure as low as possible while still doing real work.
For washing, a machine operating at 4 GPM and 1,500–2,500 PSI with a 15- or 25-degree fan tip is typically used. This method offers a deep clean without damaging the pavers' cement paste. To ensure consistent results over large areas, a surface cleaner with a controlled spray bar is often employed, preventing "tiger-striping." Johnson also cautions against using excessive pressure:
I've watched more pavers ruined by aggressive pressure washing than any other single mistake.
After the primary wash, a diluted bleach solution may be applied to eliminate mold or algae spores, reducing the chance of regrowth. For efflorescence - a white, chalky residue - professionals use a mild, paver-safe acid wash, ensuring the surface dries completely to avoid trapping salts under the sealer. It’s critical to allow the surface to dry for 24 to 48 hours before moving forward, as trapped moisture can lead to sealer hazing.
Filling Joints with Sand
Once the pavers are thoroughly dry, the next step is refilling the joints with polymeric sand. This process is essential because joint sand naturally erodes over time or may be dislodged during cleaning. Using a broom or stiff brush, professionals sweep the sand into the gaps between pavers until all joints are completely filled.
Polymeric sand offers several benefits: it helps lock the pavers in place, minimizes shifting, prevents weed growth, and deters insects from nesting in the gaps. Unlike regular sand, polymeric sand hardens when activated, creating a more durable and stable joint system. Aimee Davidow from Team Davidow emphasizes the importance of this step:
Refill the joints with polymeric sand, sweeping it evenly into the gaps. This sand helps lock the pavers in place and prevents weed growth.
For better stabilization, professionals often use a plate compactor with a protective pad to settle the sand deeply into the joints, achieving results that sweeping alone cannot. Before sealing begins, every trace of sand dust must be removed from the paver surfaces using a leaf blower. Leftover residue can cause permanent hazing once the sealer is applied. Proper cleaning and precise sand refilling ensure the pavers are secure and ready for the final sealing stage, setting the foundation for a flawless finish.
Professional Paver Sealing Process: Step-by-Step Guide by Earthworks
Selecting and Applying the Sealer
With your pavers cleaned and the joints refilled, it's time to choose and apply a sealer that suits the specific conditions of your site.
Picking the Right Sealer Type
The type of sealer you need depends on the material of your pavers. Concrete pavers, for instance, have different density levels compared to clay bricks, which are prone to efflorescence. Meanwhile, natural stones like travertine are sensitive to acidic products.
In areas with high humidity, breathable sealers are a smart choice to avoid clouding caused by trapped moisture. For surfaces like steep driveways or pool decks, safety is a priority. Penetrating silane/siloxane blends or low-sheen films with anti-skid additives help maintain slip resistance.
Each type of sealer has its own advantages:
- Solvent-based acrylic sealers: These enhance color depth and typically last 1–2 years on sunny driveways or up to 2–3 years in shaded areas.
- Water-based urethanes: Known for their low odor and VOCs, they provide a natural or satin finish and can last 2–4 years when applied properly.
- Penetrating sealers: While they don't enhance color or stabilize joints, they offer the longest durability, lasting 3–5 years.
Coverage rates usually range from 100 to 150 square feet per gallon, depending on the porosity of the pavers.
Before applying the sealer, professionals often perform a "plastic test." A square of clear plastic wrap is taped to the surface for 30 minutes. If condensation appears underneath, it means the pavers are still too wet to seal. Additionally, avoid sealing surfaces that are hotter than 90°F or exposed to direct sunlight, as this can cause bubbling or uneven drying.
Once the right sealer is selected, the next step is careful application.
How Sealant Is Applied
The sealer is typically applied using a combination of spraying and rolling. A low-pressure sprayer efficiently covers large areas, ensuring the sealer penetrates the joints, while back-rolling helps smooth out any puddles.
Robyn Buck from ShunTool shares this tip:
Maintain a consistent distance of 6 to 8 inches from the surface to avoid oversaturation.
Start with a thin first coat to allow the sealer to soak into the pores. After that, apply a second coat in a crosshatch pattern for even coverage. If a second coat is needed, wait about two hours after the first application. The texture of your pavers determines the roller nap size: smooth surfaces work best with a 3/8-inch nap, while textured pavers may require a 1/2-inch or 3/4-inch nap to reach into crevices.
As with preparation, timing and weather conditions are key. Seal your pavers on a dry day with temperatures above 50°F (ideally around 75°F) and no rain in the forecast.
After sealing, allow 24–48 hours for drying before walking on the surface and 72 hours before driving on it.
Final Inspection and Aftercare
Once the sealer is applied, professionals conduct a detailed final inspection to ensure the coverage is even and the edges are neatly finished. This step guarantees your pavers not only look great but are also well-protected for years.
Checking the Finished Work
The surface is carefully examined for any inconsistencies, such as missed spots (often called "holidays"), roller marks, lap lines, or blemishes like fish-eyes, craters, and bubbles caused by outgassing.
Edges are inspected to ensure clean lines along walls, curbs, and borders, with no sealer spilling onto vertical surfaces. Any white residue from polymeric sand is flagged, as it might indicate improper activation. Whitening or milky patches are also checked, as these can signal moisture trapped under the sealer. The surface should display a uniform sheen, free of uneven gloss or dull spots, which could point to inconsistent absorption.
Jesse Johnson from Bulletproof Pavers highlights the importance of this step:
Technique is the difference between even, durable coverage and roller marks, lap lines, and holidays.
Once the inspection confirms a consistent finish, the next focus is on ensuring the sealer cures properly to maintain its durability over time.
Drying Time and Maintenance Guidelines
After verifying the quality of the application, proper drying and maintenance become the priority. Under ideal conditions, sealed pavers can handle foot traffic in just 2 to 4 hours. However, vehicle traffic should be avoided for 48 to 72 hours to prevent damage, as uncured sealer can be stripped by tire weight or traction.
| Activity | Recommended Wait Time |
|---|---|
| Foot Traffic | 2 to 4 hours |
| Rain/Precipitation Exposure | At least 24 hours |
| Full Cure / Vehicle Traffic | 48 to 72 hours |
Sprinkler systems should remain off for at least 24 to 48 hours, and sprinkler heads should be adjusted to avoid constant spraying on the same edges. Pets should also be kept away until the surface is fully cured, as pawprints on tacky sealer are permanent.
If any whitening or milky areas appear during the inspection, they should be addressed promptly to prevent long-term issues. For ongoing care, it's crucial to rinse off substances like fertilizers, pool chemicals, or leaf tannins (especially from oak leaves) before they stain or bake into the surface. Routine cleaning with a garden hose and a neutral cleaner is recommended, while high-pressure washing should be avoided to prevent sealer erosion.
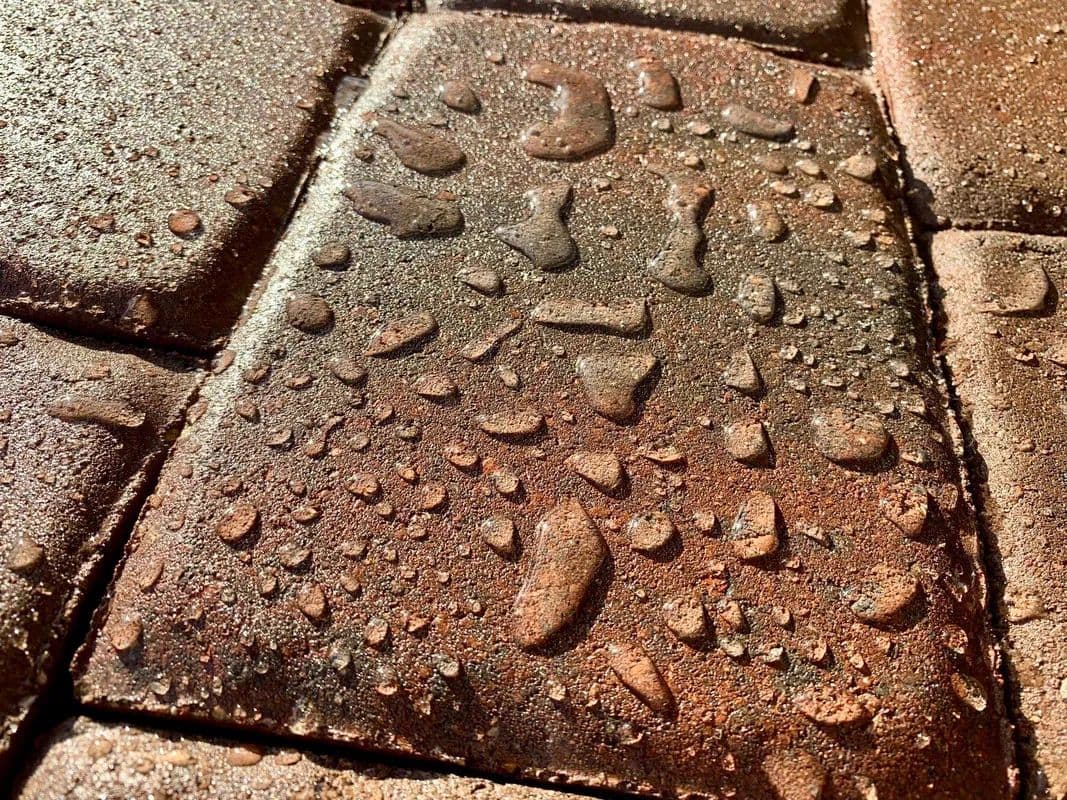
To check if the sealer is still effective, monitor for water beading on the surface. If water no longer beads and instead darkens the pavers immediately, it’s time for a maintenance coat. Most acrylic sealers need reapplication every 2 to 4 years, while urethane-based options can last 3 to 5 years.
Conclusion
Getting your pavers professionally sealed does more than just enhance their appearance. It brings back the original color and vibrancy of your outdoor spaces while adding a protective layer against UV rays, weathering, oil stains, and even fungal growth.
It’s also a smart financial move. Sealing helps your pavers last longer, cuts down on maintenance costs, and spares you from the hefty price tag of full replacements. These benefits make professional sealing a worthwhile investment for keeping your property looking its best.
If you’re looking for a trusted team, ViewCrew Services has you covered. With a perfect 5.0 rating from over 1,000 reviews, comprehensive insurance coverage, and a 100% satisfaction guarantee (including free callbacks if something isn’t right), they deliver peace of mind. Most projects are wrapped up in just one day, and many even come with a 1-year warranty.
FAQs
Will sealing change how slippery my pavers feel?
When it comes to sealing pavers, the type of sealer you choose can affect how slippery the surface feels. Film-forming sealers often leave a smoother, glossier finish, which can become more slippery, especially when wet. In contrast, penetrating sealers preserve the natural texture of the pavers, helping to maintain their grip. This distinction is important to consider, particularly for areas prone to rain or moisture, as it can help minimize the chances of slipping.
How do I know my pavers are dry enough to seal?
Pavers usually take about 48–72 hours to dry enough for sealing, though this can vary based on the weather and the type of sealer being used. For the best outcome, make sure the surface temperature is warm - around 75°F or higher - and avoid sealing when it's below 50°F. After sealing, wait at least 2–4 hours before walking on the pavers. However, allow a full 2–3 days for the sealer to cure completely before subjecting the surface to heavy use or placing any objects on it.
What can ruin a paver sealing job after it’s done?
Moisture trapped beneath sealant can completely undermine a paver sealing job, causing unsightly fogging or hazing. Another common pitfall? Skipping thorough cleaning and preparation of the surface before sealing. These missteps can significantly affect the durability and appearance of the finish. To achieve a long-lasting, polished result, careful preparation and attention to detail are absolutely crucial.