Yes, sealing after cleaning your patio or deck is highly recommended. Regular cleaning and sealing protect against moisture, UV rays, mold, and rot, extending the lifespan of your outdoor surfaces. Neglecting maintenance can lead to costly repairs or replacements, with decks lasting only 5–10 years without proper care versus 15–20 years with consistent upkeep.
Key Takeaways:
- Why Seal? Sealing creates a waterproof barrier, blocks UV rays, and prevents damage like cracking, rotting, and fading.
- When to Seal? Perform a water bead test after cleaning. If water absorbs into the surface, it’s time to reseal. Avoid sealing new wood or concrete too soon.
- Cost vs. Replacement: Annual maintenance costs $350–$700 but can save you from a $20,000 deck replacement.
Quick Steps:
- Inspect for damage – Replace rotted boards or fill cracks in concrete before cleaning.
- Clean thoroughly – Use oxygen bleach for wood; avoid chlorine bleach.
- Dry completely – Allow 24–72 hours of drying time.
- Apply sealant – Use thin, even coats under proper weather conditions (50°F–90°F, low humidity).
Sealing keeps your deck or patio looking great and prevents costly repairs. Regular maintenance is a smart investment for any homeowner.
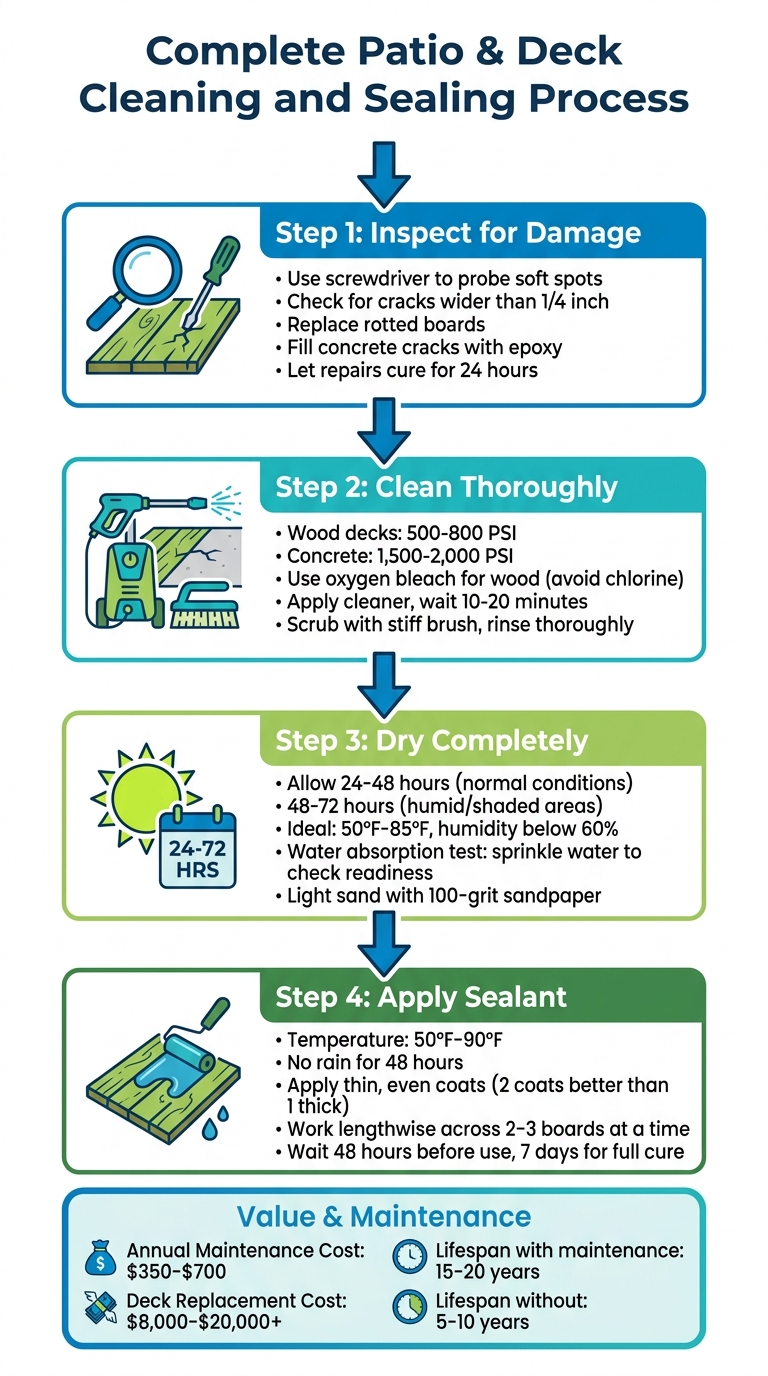
Complete Patio and Deck Cleaning and Sealing Process in 4 Steps
How to Clean, Renew and Seal a Wood Deck in One Day
sbb-itb-238bf3c
Common Problems That Damage Patios and Decks
Patios and decks face everyday wear and tear from natural elements. Spotting potential damage early can save you from expensive repairs down the road.
Weather and UV Damage
Sunlight can wreak havoc on your deck. UV rays break down lignin, the natural compound that holds wood fibers together, causing the surface to gray, splinter, and weaken over time. Even concrete patios aren't spared - prolonged sun exposure can lead to fading and cracking.
"Intense summer sun breaks down wood's lignin and fades stain colors." - Scott Deviney, Co-Founder, Exterior Shine
Temperature fluctuations also take a toll. As wood expands and contracts with changing temperatures, its fibers weaken over time. Winter adds another layer of concern - snow and ice trap moisture against surfaces, and using metal shovels or harsh de-icing salts can damage both wood and concrete. A quick water bead test can help you determine if your protective sealant is still working: if water soaks in rather than forming beads, it’s time to reseal.
Heavy rainfall strips away protective sealants and saturates wood, speeding up the rotting process. High humidity exacerbates the problem by encouraging mold, mildew, and algae growth, while also causing wood to swell and contract repeatedly, weakening its structure. If a screwdriver penetrates 1/4 inch into the wood, it’s a sign of rot.
Beyond weather, surface contaminants can accelerate the damage.
Dirt, Mold, and Debris Buildup
Debris buildup poses another set of challenges for patios and decks.
Leaves, twigs, and other debris trap moisture against the surface. This trapped moisture prevents proper drying, leading to swelling, softening, and eventual deterioration. Keeping gaps between deck boards clear helps maintain airflow and drainage.
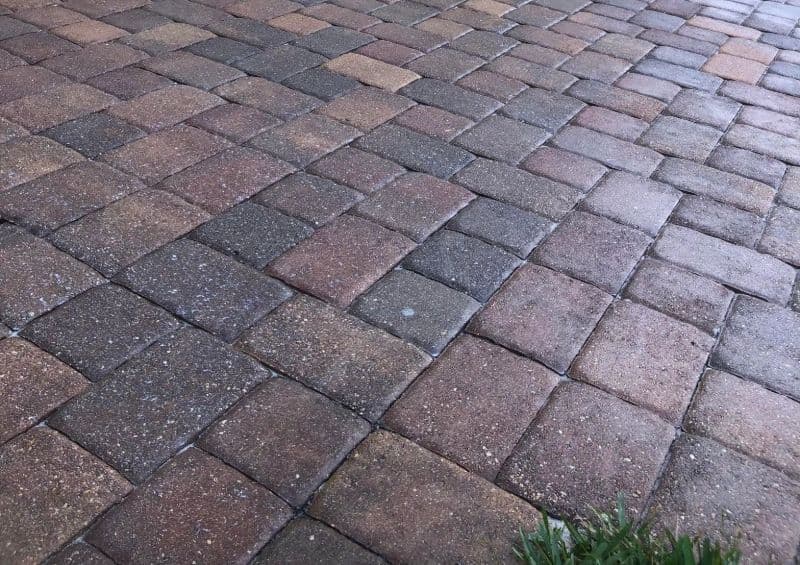
Mold, mildew, and algae thrive in the damp conditions caused by debris. These organisms break down the lignin in wood, causing rot from within. Green algae can make surfaces dangerously slippery when wet, while moss retains moisture that contributes to decay. On concrete patios, efflorescence - a white, powdery residue - can signal moisture issues that interfere with sealant adhesion.
Porous materials like wood and concrete absorb liquids, leading to deep, stubborn stains. Regular cleaning not only removes debris but also ensures your sealant works effectively.
How to Clean Your Patio or Deck
Getting your patio or deck spotless is the foundation for applying a seal that lasts. Skipping steps or rushing through the cleaning process can lead to trapped moisture, poor sealing, and wasted effort. Here's how to tackle it properly.
Check for Damage First
Before cleaning, take a close look for any structural issues. Use a flashlight and a screwdriver to inspect for damage that cleaning might worsen. For wood, probe soft spots with a screwdriver - if it sinks in deeply, you've got rot. Check underneath for sagging joists, rusted hangers, or loose fasteners. For concrete, look for cracks wider than 1/4 inch or missing grout between stones.
"This inspection is crucial: water and cleaning solutions can worsen existing damage, turning minor repairs into major problems. Fix everything you find before proceeding with cleaning." – Scott Deviney, Co-Founder, Exterior Shine
If you spot rotted boards, replace them instead of trying to seal over the damage. Tighten loose railings by replacing popped nails with screws. For concrete, use a filler or epoxy for smaller cracks and a patching compound for wider gaps. Let repairs cure for 24 hours, and sand any areas smooth to ensure even sealant application.
Once you're sure there are no structural issues, it's time to gather the right cleaning tools.
Cleaning Methods and Equipment
The right tools and techniques make all the difference in cleaning effectively without causing damage. For wood decks, set your pressure washer between 500 and 800 PSI to avoid splintering the wood fibers. Sealed concrete can handle more pressure - 1,500 to 2,000 PSI - but always test a hidden area first. Use a wide fan tip nozzle (25° or 40°), and maintain at least 12 inches of distance from wood surfaces or 6–8 inches from concrete.
When it comes to cleaning solutions, oxygen bleach is a great choice for wood, as it brightens without damaging the fibers. Avoid chlorine bleach, which can weaken wood and leave unsightly blotches. For concrete, stick to a neutral pH cleaner or a degreaser to avoid stripping the seal. Apply the cleaner, let it sit for 10–20 minutes to loosen dirt and organic growth, then scrub with a stiff brush. Rinse thoroughly, working from high to low areas so gravity helps clear away debris.
If you’re dealing with stubborn stains or flaking finishes, lightly sand the surface with 100-grit sandpaper once it’s dry. This step opens up the wood pores and creates a surface texture that helps sealants penetrate deeply.
After cleaning and rinsing, make sure the surface is completely dry before moving forward.
Drying and Surface Prep
Drying is a critical step for ensuring proper sealant adhesion. Allow 24–48 hours of drying time under normal conditions, but if it’s humid or the area is shaded, extend that to 48–72 hours. Ideal conditions include humidity below 60% and temperatures between 50°F and 85°F.
"Wood is especially good at soaking up water, which can render deck sealing products useless. Allow 24 hours of drying time after cleaning and before the next steps." – Jill Harness, Contributing Writer, Angi
To check if the surface is ready, sprinkle water on it. If the water absorbs immediately, you’re good to go. Before sealing, do a light sanding with 100-grit sandpaper to smooth out any raised fibers, ensuring the sealant adheres evenly.
Taking the time to clean thoroughly now will save you from costly repairs later and help your sealant perform at its best.
Should You Seal After Cleaning?
Once your surface is clean and prepped, the next step is deciding if sealing is the right move. Sealing can help protect your patio or deck and keep it looking its best for longer. But timing and conditions play a big role, so let’s break down when sealing is a smart choice and when it’s better to wait.
Why Sealing Protects Your Surface
Sealing does more than just improve the look of your deck or patio - it helps prevent damage that could cost you later. A good sealant creates a waterproof barrier, shielding wood and concrete from rain, snow, and meltwater. Without this barrier, moisture can seep in, leading to issues like cracking, splitting, or twisting in wood. For concrete, trapped water can cause expansion and contraction, resulting in cracks and crumbling over time.
Sealants also help block UV rays that fade colors and turn wood gray. They reduce porosity, which means spills are less likely to leave permanent stains. Plus, sealed surfaces are easier to clean - dirt and debris don’t stick as much, so you can sweep or spray them clean without needing to deep clean as often.
Knowing these benefits can help you decide when sealing is worth it.
When to Seal (and When to Wait)
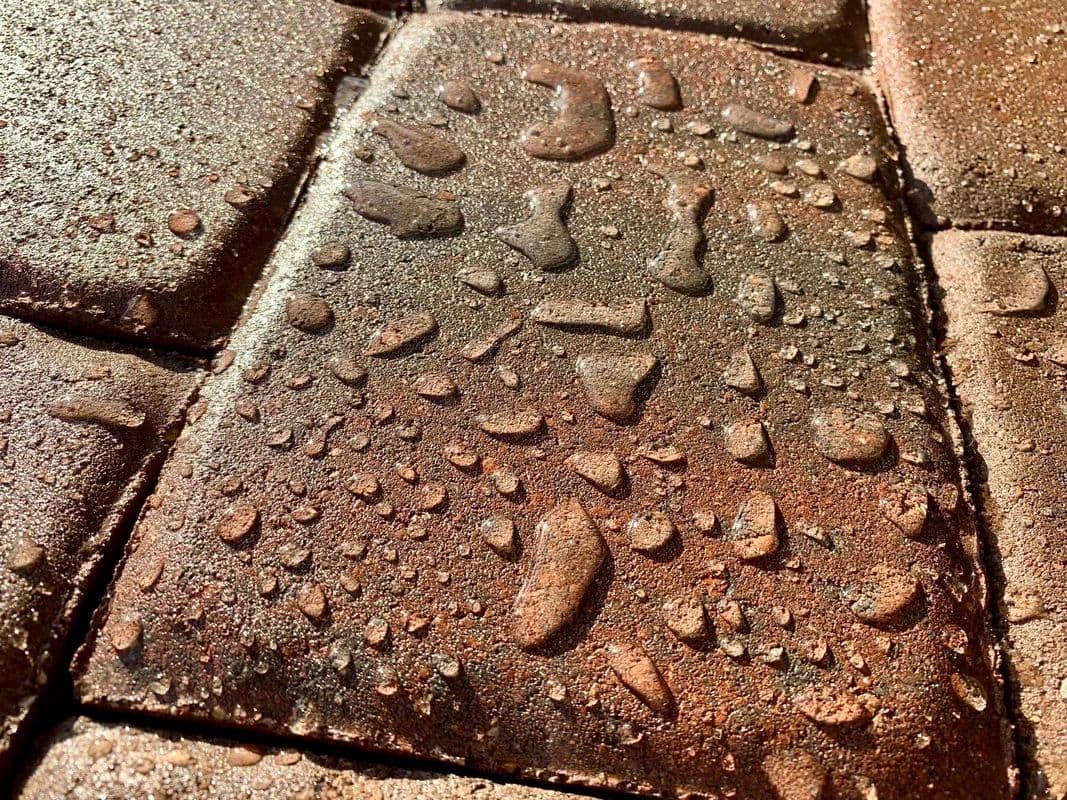
Not every surface needs sealing immediately after cleaning. The water bead test is a simple way to check. If water beads up on the surface, your current sealant is still doing its job. If the water soaks in and darkens the material, it’s time to reseal. Other signs to watch for include graying or fading from UV exposure, splintering, mold or mildew, or peeling and flaking of the old sealant.
For surfaces exposed to harsh weather or full sun, sealing every year is recommended. In milder conditions, resealing every one to two years usually works. In places with high humidity, like North Carolina, an unprotected deck can start to break down within two to three years.
Don’t rush to seal new surfaces. Pressure-treated wood needs two to six months to weather before sealing, giving the treatment chemicals time to dry. Cedar and redwood can often be sealed after one to two weeks, once the wood is dry. New concrete should cure for at least a month before applying sealant. Composite decking typically doesn’t require sealing, but the wood framing underneath might benefit from it.
"Sealing too early prevents proper adhesion; delaying too long risks significant weather damage." – Maryland Decking
Weather conditions are just as important as surface readiness. Only seal when temperatures are between 50°F and 90°F, and make sure no rain is forecast for at least 24 to 48 hours. For the best results, apply sealant in the early morning or on overcast days. This prevents the sealant from evaporating or drying too quickly, which can cause uneven finishes.
How to Apply Sealant Correctly
After thoroughly cleaning and preparing the surface, the next step is applying the sealant. This part of the process is crucial for ensuring long-lasting protection. While not overly complicated, it does require precision and a bit of patience to get it right.
Pre-Sealing Preparation Steps
Before you even open the can of sealant, make sure the surface is completely dry. A quick way to check? Pour a small amount of water on the surface - if it absorbs, you're good to go. This step is essential, especially after the 48 to 72 hours of drying time required post-cleaning.
Weather conditions play a big role in how well your sealant sets. Look for temperatures between 50°F and 85°F, with humidity levels below 70%. Also, ensure no rain is forecasted for at least 48 hours after application. If you're sealing new pressure-treated wood, let it sit and weather for at least 30 days first. For other wood types, lightly sand the surface with 60- to 150-grit sandpaper to remove any fibers that might block the sealant's absorption.
Don’t forget to protect nearby plants. Cover them with plastic sheeting or drop cloths since sealants can interfere with their ability to absorb nutrients.
Application Methods
Start by stirring the sealant gently - avoid shaking it, as this can create bubbles that could ruin the finish. Always begin with vertical surfaces, working from the top down. For horizontal surfaces, apply the sealant lengthwise across 2–3 boards at a time to keep a wet edge and avoid lap marks.
Whether you’re using a brush, roller, or sprayer, focus on applying thin, even coats. Avoid letting the sealant puddle, as this can lead to peeling or uneven drying. Two thin coats are always better than one thick coat. Thick applications tend to crack, peel, and dry unevenly, while thin coats penetrate the wood properly and wear down gradually over time. If you use a sprayer for speed, follow up with a brush to work the sealant into the wood grain for better absorption.
Once you've finished applying the sealant, make sure to follow the recommended drying and curing times for the best results.
Drying and Curing Time
While sealants often feel dry to the touch within 2–4 hours, it’s important to wait at least 48 hours before putting the surface to use. Even then, full water repellency may take up to 7 days to develop as the sealant bonds with the wood pores.
"Giving your sealer the right time to cure ensures strong adhesion, stain resistance and long-term protection - especially important in busy UK gardens and patios with furniture or BBQ traffic." – Billyjoe Jarvis
To check if the sealant has cured, press your thumb gently on a hidden area. If it doesn’t leave a mark or feel tacky, the curing process is complete. Avoid placing heavy furniture or grills on the surface until you’re sure it’s fully cured. Premature weight can cause scuffing or even permanent marks.
Product Recommendations and Ongoing Care
Picking the right sealant and keeping up with regular maintenance can help your patio or deck stay in top shape for years.
Selecting the Right Sealant
When it comes to sealants, water-based sealers are a favorite among homeowners. They’re easy to clean with soap and water, emit low levels of volatile organic compounds (less than 50 g/L for low-VOC products), and can even be applied to slightly damp wood. Rafi Friedman, President of Coastal Luxury Outdoors, notes, "If your deck is made of a fade-resistant material, I'm a fan of water-based sealers, since they last longer under all conditions."[23]
On the other hand, oil-based sealers penetrate deeper into the wood and perform well in harsh weather. However, they require paint thinner for cleanup and need to be applied to completely dry wood. They’re often more affordable upfront, with DIY costs ranging from $0.25 to $1 per square foot.
The opacity of the sealer also plays a big role:
- Clear sealers let the wood grain shine through but typically last only 6 to 12 months and offer minimal UV protection.
- Semi-transparent sealers enhance the wood’s natural color and provide 2 to 3 years of protection.
- Solid stains hide imperfections while offering 3 to 5 years of coverage, though they completely cover the wood grain.
Some recommended products include:
- Seal-Once Marine Premium Wood Sealer – known for its deep penetration and low VOCs.
- Thompson's WaterSeal Transparent – great for pressure-treated wood.
- Olympic Maximum Waterproofing Sealant – offers up to 6 years of protection.
- Defy Composite Deck Sealer – includes zinc particles for excellent UV resistance.
Once you’ve chosen and applied the right sealer, regular maintenance is key to making it last.
Maintaining Sealed Surfaces
Keeping your sealed deck in good condition requires consistent care. Weekly sweeping removes debris that can trap moisture and stain the wood. A monthly rinse with a garden hose helps prevent dirt buildup, while trimming nearby plants reduces moisture exposure.
To see if resealing is needed, try the water bead test. Most decks need resealing every 1 to 3 years, though areas with heavy foot traffic or constant sun exposure might require annual treatment.
For a deeper clean, use commercial deck cleaners or oxygen bleach solutions. Avoid chlorine bleach - it can damage wood fibers and leave blotchy stains.
With proper care, a deck can last 15 to 20 years. Neglecting maintenance, however, might bring that lifespan down to just 5 to 10 years. Considering the $8,000 to $20,000+ cost of replacing a deck, regular upkeep is a smart and cost-effective choice. Not only does it keep your outdoor space looking great, but it also protects your investment.
For those in Massachusetts, Southern New Hampshire, or Connecticut, ViewCrew Services offers tailored patio and deck cleaning solutions, complete with a 100% satisfaction guarantee.
Conclusion
Why Regular Maintenance Matters
Taking care of your deck or patio isn’t just about appearances - it’s about protecting your investment. A well-maintained deck can last 15–20 years, while one that’s neglected might only make it 5–10 years. Considering that replacing a deck can cost anywhere from $8,000 to $20,000, spending a few hundred dollars annually on maintenance is a much smarter choice.
A quick way to check if your seal is still doing its job is the water bead test. Just pour a few drops of water on high-traffic areas. If the water beads up, your seal is working. But if it soaks in within 10 to 15 seconds, it’s time to reseal.
"The real goal isn't perfection. It's prevention." – Tatiana H
Sealing is crucial for keeping moisture out of wood and preventing freeze-thaw damage in concrete. It also protects against UV rays that cause graying and splintering, while reducing the risk of mold and mildew, which can make surfaces slippery and unsafe. Over 15 years, the cost of consistent maintenance - estimated at $5,250–$10,500 - is far less than the $20,000+ price tag for a replacement. Routine care, from cleaning to resealing, ensures your outdoor surfaces stay durable, safe, and attractive while avoiding expensive repairs.
With these benefits in mind, it’s time to take the next steps to keep your patio or deck in great shape.
Next Steps for Your Patio or Deck
Now that you understand the benefits of regular maintenance, it’s time to act. Start by inspecting your outdoor surfaces. Watch for signs like graying wood, splintering, fading, or areas where water is absorbed instead of beading up - these are clear indicators that maintenance is overdue. For detailed guidance, revisit our cleaning and sealing instructions before testing your surfaces again. Use the water bead test as a quick check to ensure your sealant is still effective.
If maintenance is needed, plan to clean and seal your surfaces when temperatures are between 50°F and 90°F, with at least 48 hours of dry weather ahead. For homeowners in Massachusetts, Southern New Hampshire, or Connecticut who want professional results, ViewCrew Services offers expert patio and deck cleaning and sealing, backed by a 100% satisfaction guarantee. Taking these steps now will help you avoid costly repairs and keep your outdoor space looking great for years to come.
FAQs
What sealant type is best for my surface?
When choosing a sealant, the best option depends on the type of surface you're working with. If you're sealing wood, opt for clear or transparent sealers to maintain the natural color and highlight the grain. For concrete, look for sealers specifically designed to improve both durability and appearance. Selecting a product that matches your surface material ensures the best results.
How do I know the deck is dry enough to seal?
Wait 24–48 hours after cleaning your deck to let it fully dry. The exact time depends on factors like temperature and humidity. To check if it’s ready, touch the surface - it should feel completely dry, not damp or sticky. If the wood feels damp beneath the surface or you notice any moisture, give it more time before applying the sealant. Proper drying is key to making sure the sealant sticks well and provides lasting protection.
Should I strip old sealer before resealing?
It's usually a good idea to remove the old sealer before applying a new one to your deck or patio. Taking the time to properly prepare the surface, including stripping away the existing sealer, allows the new sealant to adhere better and work more effectively. This process helps rejuvenate and protect your surfaces, ensuring the resealing delivers optimal results.