Pressure washing can clean your home's exterior effectively, but it can also damage your plants if you're not careful. High-pressure water, harsh chemicals, and excessive runoff can harm foliage, roots, and soil. Here's how to protect your plants while pressure washing:
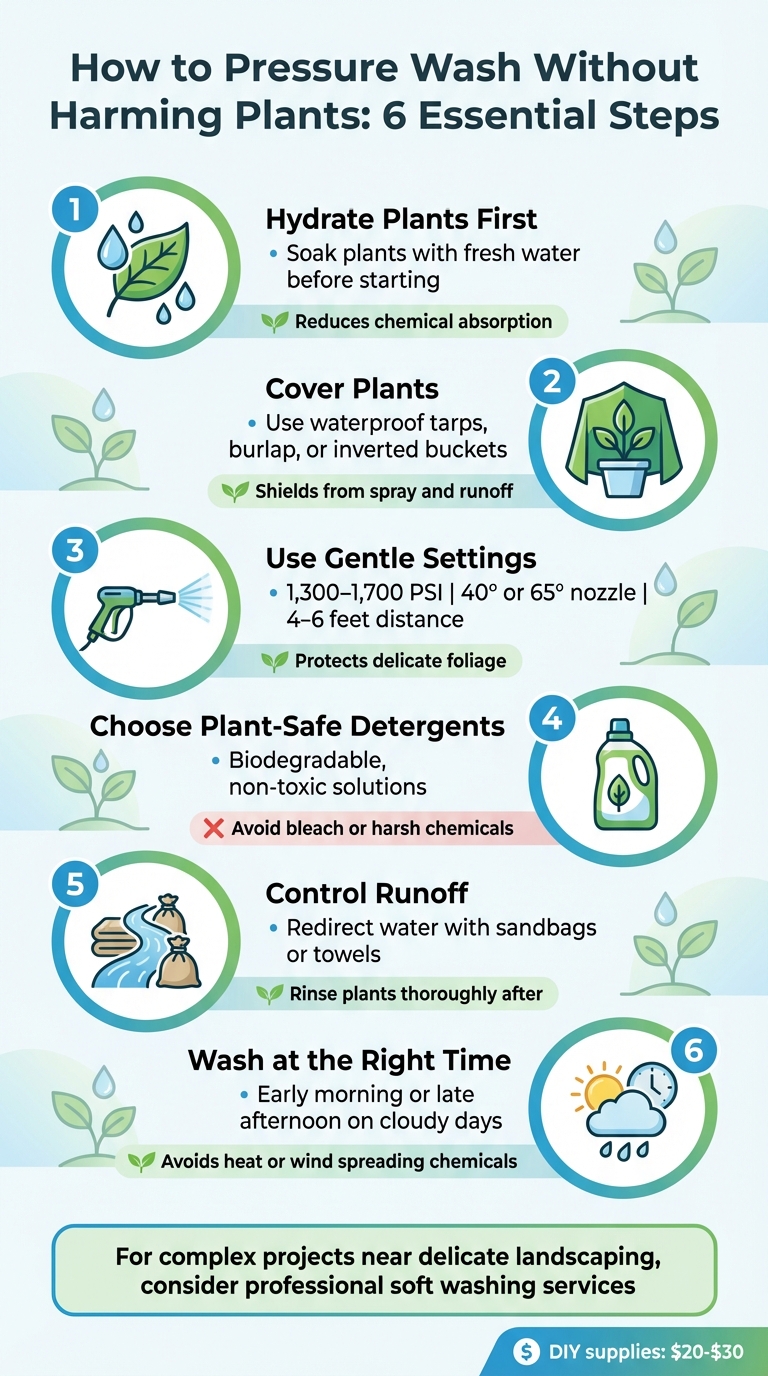
- Hydrate Plants First: Soak plants with fresh water before starting to reduce chemical absorption.
- Cover Plants: Use waterproof tarps, burlap, or inverted buckets to shield plants from spray and runoff.
- Use Gentle Settings: Stick to 1,300–1,700 PSI with a 40° or 65° nozzle, and keep the spray 4–6 feet away from plants.
- Choose Plant-Safe Detergents: Opt for biodegradable, non-toxic solutions and avoid bleach or harsh chemicals.
- Control Runoff: Redirect water using sandbags or towels, and rinse plants thoroughly after cleaning.
- Wash at the Right Time: Early morning or late afternoon on a cloudy day is best to avoid heat or wind spreading chemicals.
For complex projects near delicate landscaping, hiring a professional pressure washing company that uses soft washing techniques may be a safer option. Protecting your plants ensures a clean home exterior without risking your garden's health.
Step-by-Step Guide to Pressure Washing Without Harming Plants
How to protect the plants and other landscaping while pressure washing the house
sbb-itb-238bf3c
Preparing the Area Before Pressure Washing
Before you start pressure washing and roof cleaning, it’s important to protect your plants. Setting up proper barriers ensures you can clean effectively without causing harm to your landscaping.
Tools You'll Need
Make sure you have the right supplies on hand. You’ll need waterproof tarps or plastic sheeting to cover plants, along with stakes or duct tape to secure them. Sandbags or rolled-up towels are useful for directing chemical runoff away from plant roots. A garden hose with a shower nozzle is essential for pre-soaking and rinsing plants. When selecting a pressure washer nozzle, go for a 40-degree white tip or a 65-degree black soap tip - these wide-angle nozzles reduce water pressure near sensitive areas. All these supplies, including detergent, tape, and tarps, typically cost between $20 and $30.
Once your tools are ready, start by hydrating your plants.
Water Your Plants First
Give your plants a thorough soak with fresh water early in the morning before pressure washing. This step helps saturate plant tissues, making them less likely to absorb harmful chemicals. Hydro Clean highlights the importance of this step:
"Well-hydrated plants are less likely to absorb the cleaning chemicals, as their tissues are already saturated with clean water. This creates a protective buffer against potentially harmful substances."
Additionally, wet soil helps dilute any chemicals that might seep into the ground, reducing their impact on plant roots. Pay special attention to plants under rooflines or near gutters, as these areas often experience the most runoff.
After soaking, take steps to physically shield your plants.
Cover and Protect Your Plants
Move potted plants out of the cleaning area whenever possible. For plants that can’t be relocated, cover them with burlap if the project will take more than an hour. Burlap allows air and light to pass through while offering protection from chemical spray. For stronger barriers, use plastic sheeting and secure it with stakes or weights to prevent it from shifting during cleaning.
For smaller or more delicate plants, place inverted buckets over them for extra protection. Use sandbags or rolled-up towels to redirect water and chemical runoff away from root zones. Once you’ve finished cleaning, remove any plastic coverings promptly, especially in warm weather, to avoid stressing the plants.
How to Pressure Wash Around Plants
Once your plants are protected, it's time to focus on cleaning in a way that minimizes water and chemical exposure to your landscaping.
Set the Right Pressure and Angle
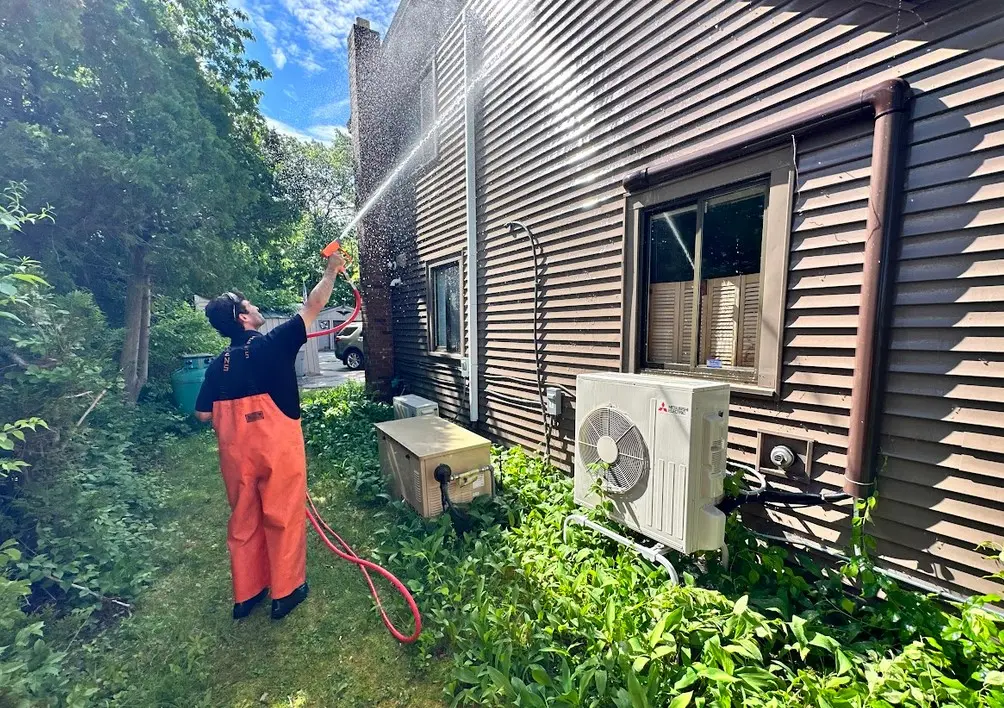
Start with a pressure setting between 1,300 and 1,700 PSI when working near plants. This range is gentle enough to avoid harming fragile foliage while still effective for cleaning. Attach a 40° white nozzle or a 65° black nozzle, and keep a safe distance of 4 to 6 feet from plants to reduce the force of the spray.
Hold the spray wand at a 45° angle to avoid eroding soil or causing splashback. Steer clear of spraying directly perpendicular to the ground near plants, as this can disturb their roots and surrounding soil.
Before tackling the entire area, test your pressure and spray pattern on a less noticeable spot. If you need more power, simply move the nozzle closer rather than switching to a higher-pressure tip. These adjustments will work hand-in-hand with the protective measures you’ve already put in place for your plants.
Direct Water Away from Plants
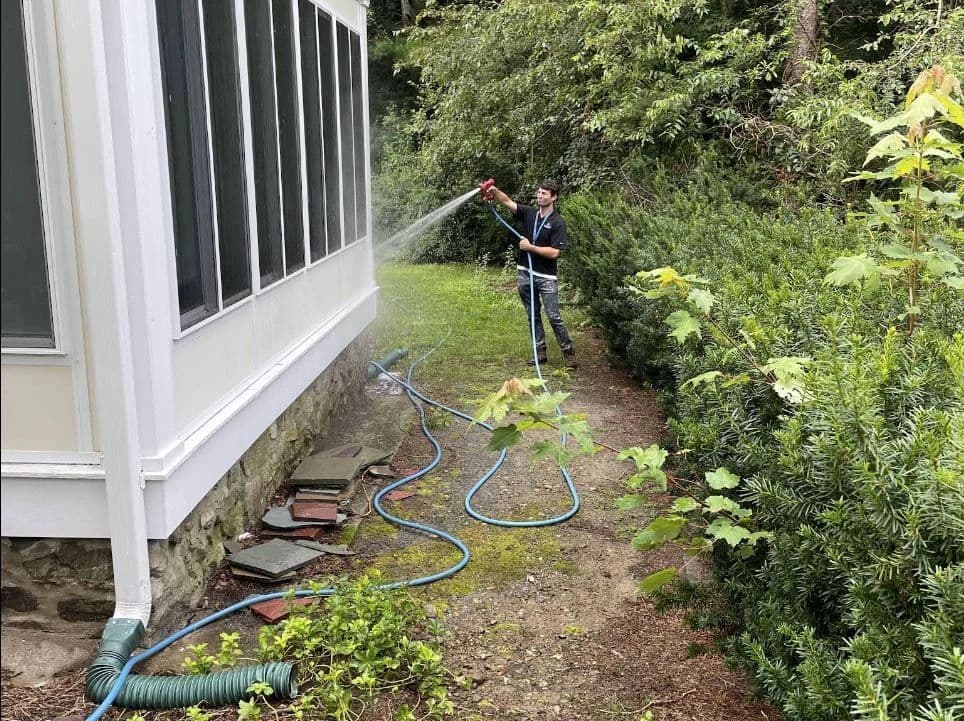
Once the pressure and angle are set, focus on guiding water and detergents away from your landscaping. Always position yourself so that the flow of water moves away from plant beds. For vertical surfaces like siding or fences, keep the spray level or slightly angled downward. This helps prevent water from seeping behind materials or pooling near plant roots.
"Direct the water stream parallel to or away from plant beds, never toward them." - Hydro Clean
For sloped areas, avoid washing upward. This can send dirty runoff straight into garden beds at the base of the slope. Instead, work from the top down, letting gravity naturally carry water away from your plants.
Control Water Runoff
Managing runoff is just as important as proper spraying techniques. Keep an eye on water flow and adjust if you notice pooling near plants. To divert water, you can use sandbags or rolled-up towels around root zones. For plants located downhill from your cleaning area, create a barrier using plastic sheeting staked into the ground.
If runoff does make its way into plant beds, act quickly. Flush the soil with fresh water to dilute any lingering chemicals and protect your plants from potential damage.
Selecting Plant-Safe Cleaning Solutions
Once you've taken steps to protect your plants and adjusted your washing techniques, the next priority is choosing cleaning solutions that won’t harm your landscaping. Even with careful application, harsh chemicals can seep into the soil and potentially damage plant roots.
Use Biodegradable Detergents
When selecting cleaning products, look for labels that specify terms like "biodegradable," "non-toxic," or "plant-safe." These products break down naturally and are less likely to harm your plants compared to industrial chemicals. For example, sodium percarbonate - a safer oxygen bleach alternative - effectively tackles mold and mildew without causing harm to vegetation. Similarly, hydrogen peroxide-based cleaners are excellent for removing organic growth without endangering plant life. Natural surfactants derived from plant oils can also help lift dirt gently without being overly harsh.
"Opt for 'biodegradable and plant-safe cleaning detergents, and avoid harsh chemicals that can harm plants, such as acidic solutions or bleach'." - Hotsy Equipment Company
Steer clear of chlorine bleach and alkaline degreasers, as these can disrupt soil pH levels and reduce the availability of nutrients. Always review the active ingredients and follow the manufacturer’s instructions to ensure the product is safe to use near plants.
Dilute and Apply Carefully
Proper dilution is key. Always adhere to the manufacturer’s guidelines - using a concentrated solution won’t improve cleaning results but does increase the risk to your plants. As mentioned earlier, pre-watering your plants can help reduce chemical absorption.
When applying detergents, use a low-pressure soap nozzle to limit overspray as part of your pressure washing process. Work in small, manageable sections, applying the solution from the bottom up on vertical surfaces. This technique keeps the lower areas wet and prevents concentrated streaks from running onto plants. Avoid cleaning on windy days or under direct sunlight, as heat can cause the solution to dry too fast, potentially intensifying chemical reactions. Even with biodegradable cleaners, rinse nearby plants thoroughly with fresh water after cleaning to remove any residual film.
Post-Washing Care and Best Timing
Rinse Plants Immediately After
Right after pressure washing, make sure to rinse nearby plants with clean water. This step is crucial to dilute and wash away any cleaning agents that might have landed on the leaves or seeped into the soil. Use a gentle shower nozzle or a rain-like setting to avoid harming delicate foliage.
"As soon as you complete pressure washing, thoroughly rinse all plants in the vicinity with clean, fresh water. This helps dilute and wash away any cleaning agents that may have reached them." - Hydro Clean
If you notice runoff pooling around plant roots, flush the area with plenty of water to prevent chemical buildup. Keep an eye on your plants for the next 72 hours for signs of stress, such as wilting, discoloration, browning edges, or sudden leaf drop. If you spot any of these issues, increase watering (as long as the soil isn’t already waterlogged) and consider providing temporary shade to help the plants recover.
Choose the Right Time of Day
The time of day you choose for pressure washing can make a big difference in protecting your plants. Aim for early morning or late afternoon when temperatures are cooler. This timing ensures that any water on the plants dries at a steady pace, reducing the risk of scorching during the hottest parts of the day.
"Early morning or late afternoon is ideal for pressure washing. These times ensure that any water that does get on the plants will dry quickly but not so quickly that it burns foliage during the hotter parts of the day." - Wash-N-It
If possible, opt for cloudy days to avoid the sun amplifying any chemical reactions. Stay away from windy conditions, as gusts can spread cleaning agents farther than you might expect. For seasonal planning, spring and fall are ideal. Early spring is particularly helpful since many plants are dormant, while fall coincides with vegetation naturally dying back. Avoid pressure washing during extreme heat, drought, or when plants are in the middle of flowering or fruiting.
When to Hire Professional Pressure Washing Services
After taking steps to protect your plants during and after pressure washing, you might want to consider hiring professionals for more complex or high-risk cleaning tasks.
While DIY pressure washing might seem doable, safeguarding delicate landscaping calls for specialized skills and equipment. If your property features valuable plants, extensive gardens, or structures near sensitive foliage, professionals can help you avoid damaging mistakes. High-pressure equipment, when misused, can strip bark from young trees, snap stems, or even cause chemical burns to plants.
Professional services, like those offered by ViewCrew Services, use soft washing techniques designed to be gentler on landscaping. This approach operates at pressures below 500 PSI and relies on biodegradable cleaning solutions - usually containing just 1% cleaning agent - to break down dirt and organic buildup. By avoiding harsh physical force, soft washing minimizes the risk of harming your greenery. Trained technicians also identify sensitive plant species and adjust their methods accordingly, keeping a safe 4–6 foot distance from garden beds and directing sprays away from vulnerable plants.
"Our trained team also carefully protects your landscaping throughout the cleaning process, ensuring your plants and lawn remain unharmed." - ViewCrew Services
In addition to technique, professionals take steps to manage runoff effectively. They use tools like downspout bags and barriers to keep chemical-laden water from reaching plant roots. They also monitor weather conditions to ensure cleaning solutions dry properly and don’t wash into the soil during unexpected rain. ViewCrew offers free, no-obligation estimates and operates in select regions with a satisfaction guarantee, providing peace of mind for homeowners.
When reaching out for a quote, ask if their services include pre-wetting and post-rinsing of plants. Also, confirm that they carry full liability insurance to protect your property in case of any accidental damage. This extra diligence ensures your landscaping stays safe while your property gets the thorough cleaning it needs.
Conclusion
Keeping your plants safe during pressure washing boils down to three key steps: preparation, technique, and aftercare. Start by giving your plants a deep watering to saturate their tissues and dilute any chemicals that might come into contact with them. Make sure to cover delicate foliage to protect it from potential harm.
When it’s time to clean, stick to a low-pressure soft washing method. Use a wide-angle nozzle (between 40° and 60°) to reduce the risk of damage, and keep the spray at a safe distance - typically 4 to 6 feet away from your plants. Always direct the spray away from garden beds, and use barriers like sandbags or rolled towels to block chemical runoff. Opt for biodegradable detergents instead of harsh, bleach-based cleaners that can alter soil pH.
After washing, rinse your plants thoroughly with fresh water to wash away any leftover solution. Keep an eye on them for the next 72 hours to spot any signs of stress. For best results, schedule your cleaning on a cloudy day or early in the morning to prevent solutions from drying too quickly on the leaves.
If your landscaping is extensive or you’re dealing with tricky drainage issues, hiring professionals might be the way to go. Pressure washing experts like ViewCrew Services specialize in soft washing with biodegradable solutions and serve areas in Massachusetts, Southern New Hampshire, and Connecticut.
FAQs
What plants are most likely to get damaged by pressure washing?
Delicate plants - like newly planted flowers, perennials, or those with shallow roots - are particularly vulnerable. They can face physical damage, soil erosion, or even harm from cleaning solutions. To safeguard them, you can cover the plants with a tarp and opt for low water pressure when working around these sensitive areas.
How can I tell if my plants were harmed after pressure washing?
Inspect your plants carefully for any signs of harm after pressure washing. Look out for bruising, torn leaves, stripped bark, or broken stems - these are clear warnings that your plants might have been impacted. Additionally, check the foliage for discoloration or wilting, as these can also indicate damage caused during the cleaning process.
When should I hire ViewCrew Services instead of doing it myself?
If you're looking to protect your plants and landscaping while getting professional pressure washing done, consider hiring ViewCrew Services. They understand the correct pressure levels to use and take the necessary precautions to prevent damage. This makes them a great choice if you're unsure about proper techniques or if your property has delicate or expansive greenery. Their expertise ensures both safety and excellent results, especially for those worried about harming their landscaping.