

If your vinyl siding has green streaks, yellow pollen, chalky salt film, or black grime near the bottom, wash it with a hose, a soft brush, and the mildest cleaner that fits the stain. In most of New England, I’d clean siding every 12 to 18 months. If the home is near the coast, under heavy tree cover, or close to salted roads, I’d check it twice a year.
Here’s the short answer:
- Pollen and dirt: use water and mild soap
- Light algae or mildew: use a 70/30 water-vinegar mix
- Heavy mildew, algae, or salt film: use a diluted bleach mix
- Work in small sections: cleaner on, wait 5 to 10 minutes, light scrub, then rinse
- Avoid high pressure: water behind siding can lead to damage, especially after freeze-thaw weather
- Call a pro: for upper stories, old brittle siding, or stains that come back fast
New England siding takes a beating from humid summers, spring pollen, coastal salt air, and winter road grime. The fix is simple: first figure out what’s on the wall, then use the right cleaner, protect plants and outlets, and rinse the siding the right way.
A quick way to read the mess:
| Problem | What it looks like | Where it shows up | What I’d use |
|---|---|---|---|
| Algae | Green patches or streaks | Shady or north-facing walls | Water + vinegar |
| Mildew | Black or dark specks | Damp corners, under soffits | Diluted bleach mix |
| Pollen | Yellow film | Across the whole house in spring | Soap + water |
| Salt film | Chalky white or gray layer | Coastal homes, near roads | Stronger wash + good rinse |
| Winter grime | Mud, soot, dark lower stains | Bottom panels near foundation | Soap + water, spot scrub |
Bottom line: if I can reach it safely from the ground and the buildup is light, I’d clean it myself. If it’s high, stubborn, or keeps coming back, I’d bring in a siding cleaning pro.
How to Clean Vinyl Siding | Ask This Old House
sbb-itb-238bf3c
2. Common Siding Problems in New England and How Often to Clean
New England weather tends to leave the same kinds of mess on vinyl siding year after year. Humid summers, freezing winters, coastal salt air, and lots of tree cover all play a part. And the pattern of buildup on the siding usually tells you two things right away: what you're dealing with and how soon you should clean it.
Mildew, Algae, Pollen, Salt, and Winter Residue
The location of the buildup is often the first clue. Algae and mildew usually show up first on north-facing walls and in spots where shrubs or trees block airflow, since those areas stay damp longer after rain. Pollen tends to cover the outside of the house in spring as a yellow dust. Salt residue stands out most on coastal homes and on siding near salted roads, where it often leaves a chalky gray film. Winter grime - a mix of road salt, mud, slush, and soot - usually builds up on the lower panels near the foundation.
Once you know the signs, these stains are pretty easy to read.
| Buildup Type | Appearance | Common Locations |
|---|---|---|
| Algae | Green shading or fuzzy patches | North-facing walls, shaded areas, near trees |
| Mildew | Black or dark green specks/streaks | Damp corners, under soffits, behind shrubs |
| Salt residue | Chalky gray film | Coastal properties, siding near roads |
| Pollen | Yellow powder | Entire exterior, especially in spring |
| Winter grime | Streaks, mud, and soot | Lower panels near foundation and vents |
For most homes in New England, a full siding wash every 12 to 18 months is a good rule of thumb. Homes close to the shoreline, on heavily wooded lots, or next to busy roads may need cleaning twice a year.
Next, it helps to match each type of buildup with the safest tools and cleaners for vinyl.
Signs Your Siding Needs Cleaning Now
If you can see buildup, it’s usually time to act. Green or black streaks are one of the clearest signs of algae or mildew growth. A chalky gray film across the surface - especially on the lower panels - usually points to salt residue. Dark drip lines under gutters, soffits, or downspouts mean moisture and dirt keep running down the same path, and those stains can set in if you leave them too long.
Two simple checks can help confirm what’s on the siding:
- Wipe a low section with a damp white cloth. Green or gray residue often means algae or mildew.
- Compare the sunny side of the house with the shaded side. If the shaded side looks darker or greener, algae and mildew have likely started to spread.
If a nearby patio or walkway feels slick, that’s another clue. The siding next to it is often dealing with the same moisture issue.
Those signs point you toward the right cleaning method.
3. Tools, Cleaners, and Safety Basics Before You Start
Once you know what kind of buildup you're dealing with - pollen, salt, mildew, or winter grime - it’s time to grab the right gear. That part matters more than people think. Use the wrong tool or cleaner, and you can scuff, stain, or damage vinyl. Start with the safest option first, not the harshest one.
What to Use and What to Avoid on Vinyl
For most jobs, you only need a few basic items: a garden hose with a spray nozzle, a bucket, and a soft-bristle brush or long-handled siding mop. Paul D., owner of The Punchlist Boys, says it best:
"A long-handled brush mop with soft synthetic bristles is the best tool for the job."
The right cleaning mix depends on the type of buildup. Here’s the quick version:
| Buildup Type | Recommended Solution |
|---|---|
| General dirt, pollen, soot | Warm water + mild dish soap or a biodegradable all-purpose cleaner |
| Light mildew or algae | 70% water + 30% white vinegar |
| Stubborn mildew, heavy algae, or salt film | 3 quarts water + 1 quart bleach + 1/3 cup detergent + 2/3 cup TSP substitute |
If you’re using a soft wash setup, keep the pressure low - usually under 500 PSI. That helps clean the siding without cracking panels or forcing water behind them.
A few things are off-limits on vinyl: steel wool, wire brushes, abrasive pads, undiluted bleach, acetone, and nail polish remover. Also, never mix bleach with ammonia-based cleaners.
Once you’ve picked the cleaner, get the house ready before you start spraying.
How to Prep Your Home and Yard Before Washing
A little prep goes a long way. Close all windows and doors. Cover exterior outlets and light fixtures with plastic and tape. Move patio furniture, grills, and potted plants away from the house.
If you have garden beds or shrubs near the siding, soak them well with fresh water before applying any cleaning solution. Then cover them with plastic sheeting. When you’re done washing, rinse them again. If branches or shrubs are touching the siding, trim them back. Plants pressed against vinyl trap moisture, and that can speed up mildew growth.
For your own safety, wear rubber gloves, safety goggles, non-slip shoes, and long sleeves any time you’re working with bleach or TSP-based solutions. Use an extension pole for hard-to-reach sections instead of stretching or climbing awkwardly.
Before cleaning the full wall, test the solution on a hidden spot first. It’s a simple step, but it can save you a headache. Try to wash on a cloudy day too, since direct sun can dry the cleaner too fast and leave streaks.
With the area set up, you’re ready to wash from the top down.
4. How to Clean Vinyl Siding Step by Step
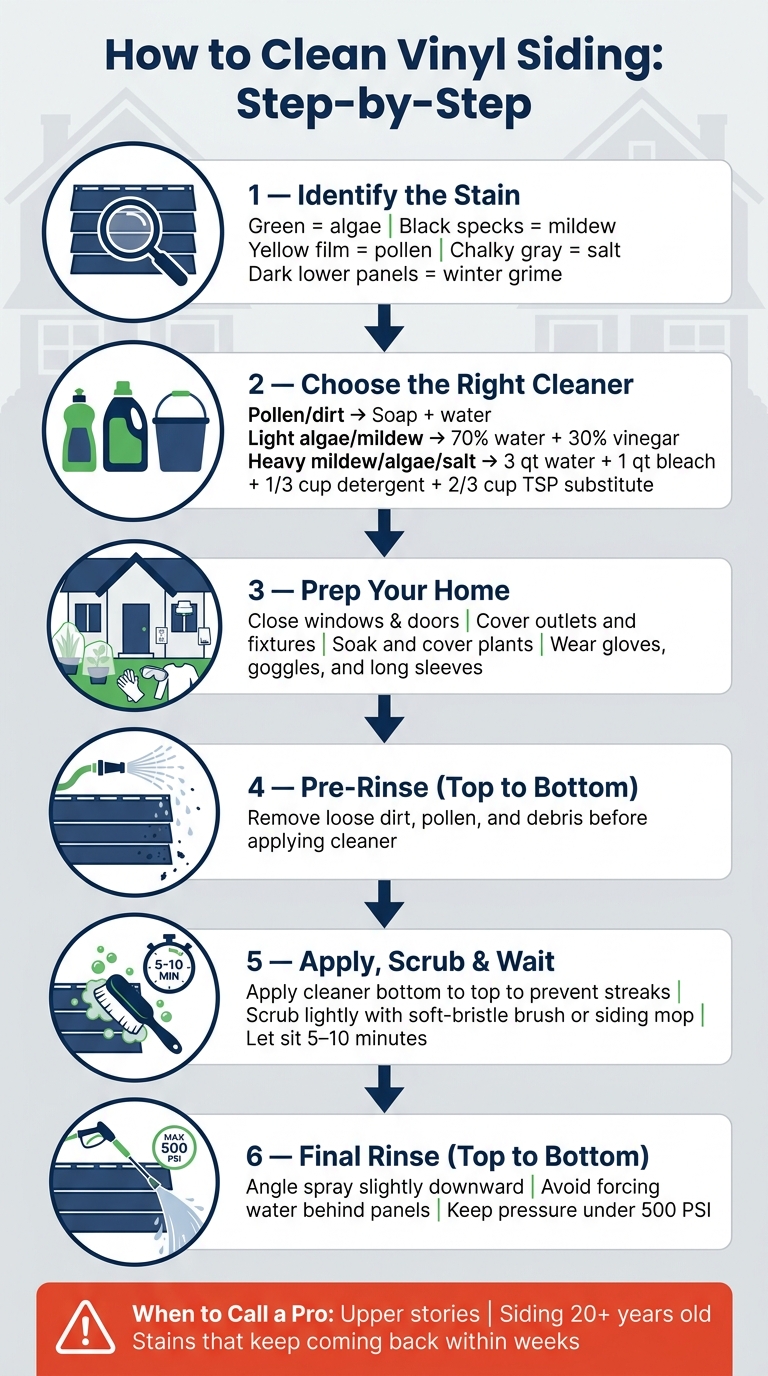
How to Clean Vinyl Siding: Step-by-Step Guide for New England Homes
Work in small sections so the cleaner stays wet until you rinse it off. That makes the job easier and helps cut down on streaks. Tackle one area at a time.
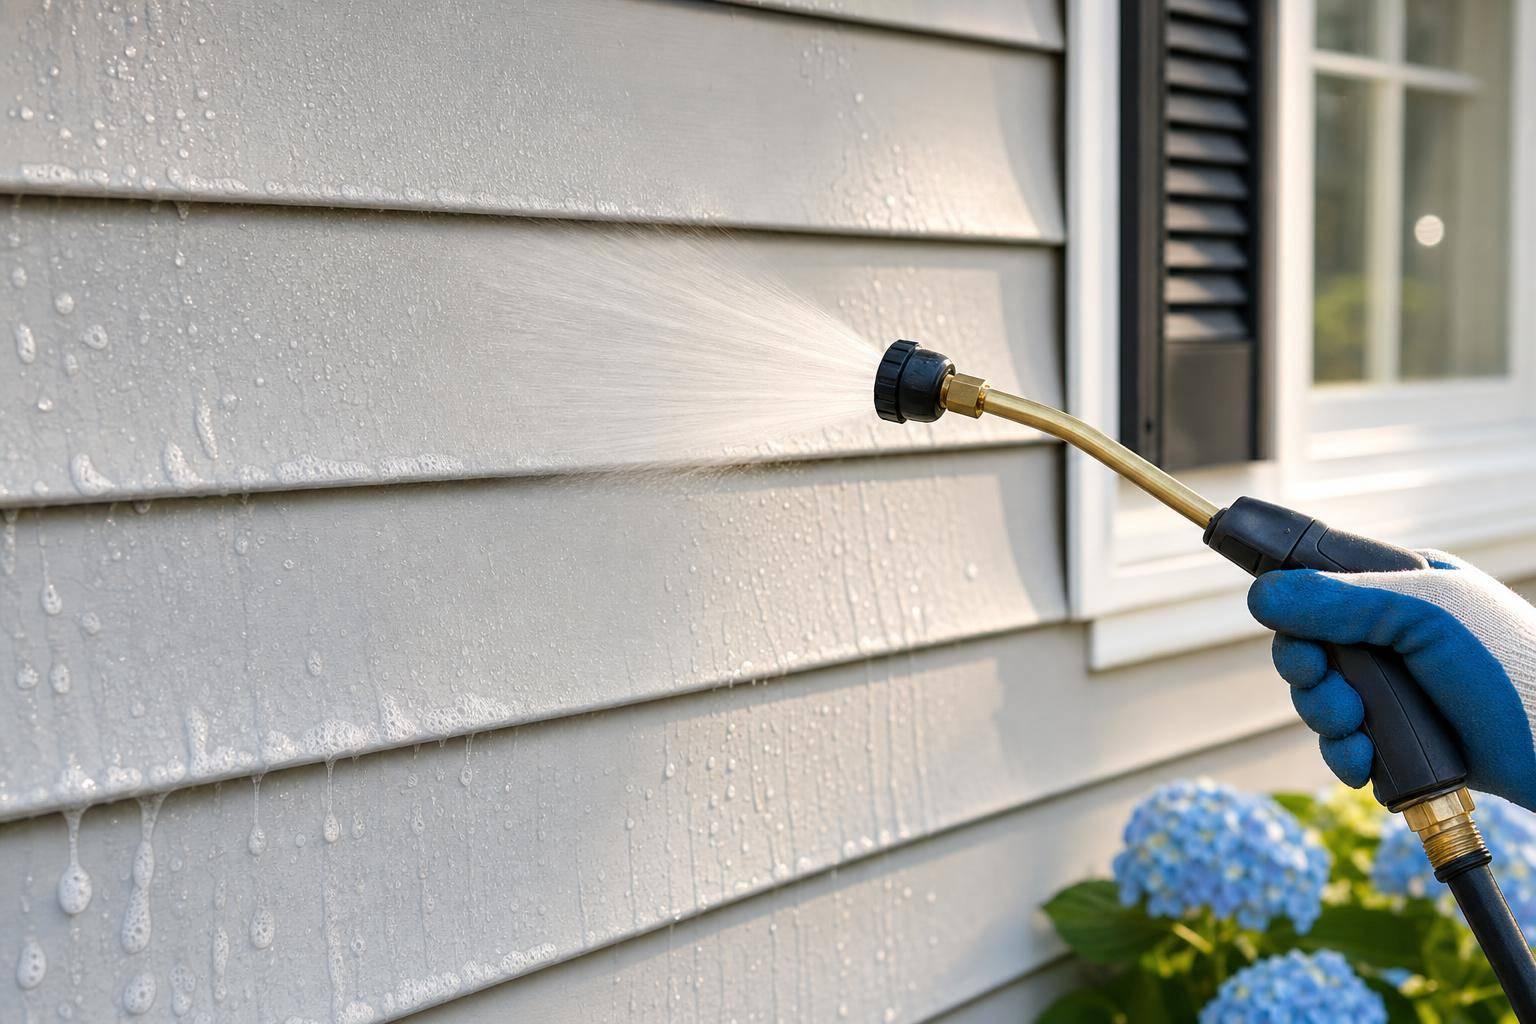
Soft Washing with a Garden Hose and Soft Brush
Start by rinsing the siding from top to bottom with a garden hose. This clears off loose dirt, pollen, and spiderwebs before you put any cleaner on the surface.
Once the siding is wet, apply cleaner from the bottom up:
"The reason you start spraying detergent from the bottom and work your way up is that anything sprayed on the top will fall into a wet spot below, preventing streaks." - Mauro Henrique, Paint Expert
Let the cleaner sit for 5 to 10 minutes. That's usually enough time to loosen grime and organic growth, but not so long that it dries on the siding. Then scrub lightly with a soft-bristle brush or siding mop.
Rinse well from top to bottom. While rinsing, keep the spray wand angled slightly downward so water doesn't get behind the panels.
Treating Mildew, Algae, Salt Film, and Stubborn Stains
Soap and water will take care of most messes. But some spots need a stronger cleaner.
If a dark stain doesn't come off with soap, test a diluted bleach mix on a hidden area first. If the stain turns white, you're likely dealing with mildew or algae. If it stays dark, it's probably dirt, which means a standard cleaner should work.
For homes near the coast, rinse siding with fresh water once or twice during the summer. That helps remove salt film before it sticks to organic matter and gets harder to clean off.
For grime near the foundation, try a paste made from baking soda and water. Apply it right to the stained spot for small, stubborn marks.
If you're dealing with upper stories, steep slopes, or heavy buildup, stop there and call a pro.
Pressure Washing Risks and When Not to DIY
Pressure washing can damage vinyl siding. It may crack panels or push water behind them. In New England, that trapped water can be a bigger problem in the fall and winter. If moisture gets behind the siding and then freezes, it can expand and cause damage to the structure.
"Skip the power washer, though; it can push too much water behind the siding and compromise the integrity of your home's exterior." - Paul D., Owner, The Punchlist Boys
If someone does use a pressure washer, keep the tip 12 to 18 inches away from the siding. And never use a 0-degree or 15-degree tip on vinyl siding.
For upper stories or heavy buildup, hire a professional. If you need extra reach, use extension poles instead of climbing.
5. Seasonal Upkeep and When to Hire ViewCrew Services

New England weather is hard on vinyl siding across a full year. A simple seasonal routine can help you catch small issues before they turn into expensive repairs.
A Simple Once-a-Year Cleaning Schedule for This Region
When you clean matters just as much as how you clean. Here’s a practical way to handle it through the year:
- Spring, after the last thaw: Walk the full perimeter and check for cracks, loose panels, or failed caulking that winter may have caused. Look closely at north-facing walls, where mildew tends to build up fastest. Then wash in late spring or early summer, before heat bakes in winter salt, soot, and road film.
- Mid-to-late summer: Inspect shaded, damp areas behind shrubs and under deep eaves. These spots stay wet longer, so algae and mildew often return there first. Wooded or heavily shaded properties may need more frequent cleaning for algae and mildew.
- Fall (before the first freeze): Remove dust, bird droppings, and debris, then check seams and caulking for gaps. Seal those gaps before freeze-thaw cycles push water inside.
Coastal properties like Cape Cod or Portland usually need more frequent freshwater rinses during the year to remove salt residue and sea spray before it sticks to the siding surface. Inland homes dealing mostly with pollen and dust can usually stick with the standard schedule.
One small habit goes a long way: trim shrubs and tree branches back from the siding. More airflow and sunlight can slow mildew and algae from coming back between cleanings.
If growth comes back fast or the siding is tough to reach, it’s time to move past routine upkeep and bring in a pro.
When Professional Exterior Cleaning Is the Safer Choice
A simple rule after your annual wash: if the problem is high, stubborn, or keeps coming back, that’s usually where DIY should stop.
DIY can work for light buildup you can reach from the ground. But when siding is high up, growth keeps returning, or the panels are too old to handle pressure, it makes sense to call a pro.
Height is the clearest cutoff. If you need to go above the first story on a ladder, the risk jumps fast. Extension poles or garden sprayers may help with a few awkward spots, but they don’t replace safe access.
The kind of buildup matters too. If mildew or algae returns within a few weeks after cleaning, a garden hose and brush usually won’t do enough.
Older siding needs extra care as well. Vinyl that’s 20 years old or more can become brittle from New England freeze-thaw cycles, which makes it more likely to crack under pressure. If you’re not sure how well your siding will hold up, a professional should check it first. Professional cleaning also includes a closer look at caulking, panel seams, and signs of moisture intrusion - details that are easy to miss during a basic wash.
For multi-story homes, recurring mildew or algae, or siding older than 20 years, ViewCrew Services offers insured exterior cleaning and a careful inspection of seams and caulking.
FAQs
Can I clean vinyl siding without bleach?
Yes. For general dirt and grime, use water and mild dish soap.
For mildew or algae, mix 1 cup of distilled white vinegar with 1 gallon of water. If a spot won’t budge, try oxygen bleach or a baking soda and water paste.
What time of year is best to wash siding in New England?
In New England, late spring or early fall is usually the best time, since temperatures tend to be mild and steady.
Spring works well for washing away winter salt, soot, and pollen before summer humidity gives algae and mildew a chance to spread. Fall is also a smart window. It helps remove leaves and sap before freezing weather sets in, which can lower the risk of moisture getting trapped in siding seams.
Pick a dry, overcast day above 32°F so the siding can dry the way it should.
How do I know if my siding is too old or brittle to clean myself?
Look for visible cracks, holes, warping, missing panels, or a loose lock. In New England, years of freeze-thaw cycles can make vinyl siding brittle over time.
If you spot brittleness or signs of past cleaning damage - like discoloration, chips, or loose panels caused by water intrusion - skip the power washer. Use a slow brush-and-hose method instead, and think about getting a professional inspection so you don’t make the damage worse.


